“That posture which is steady and comfortable is āsana.” – Patanjali
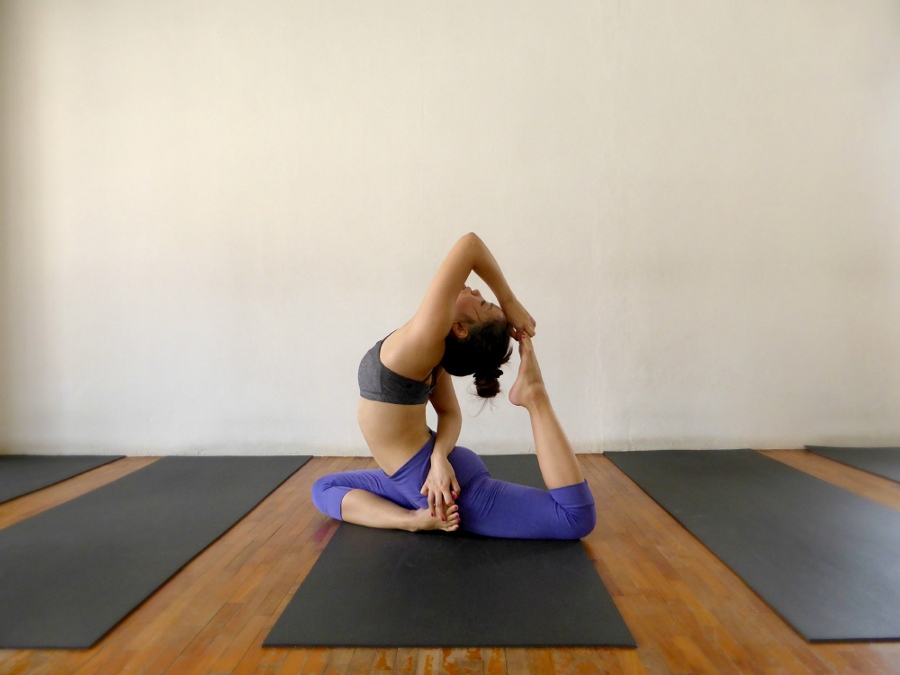
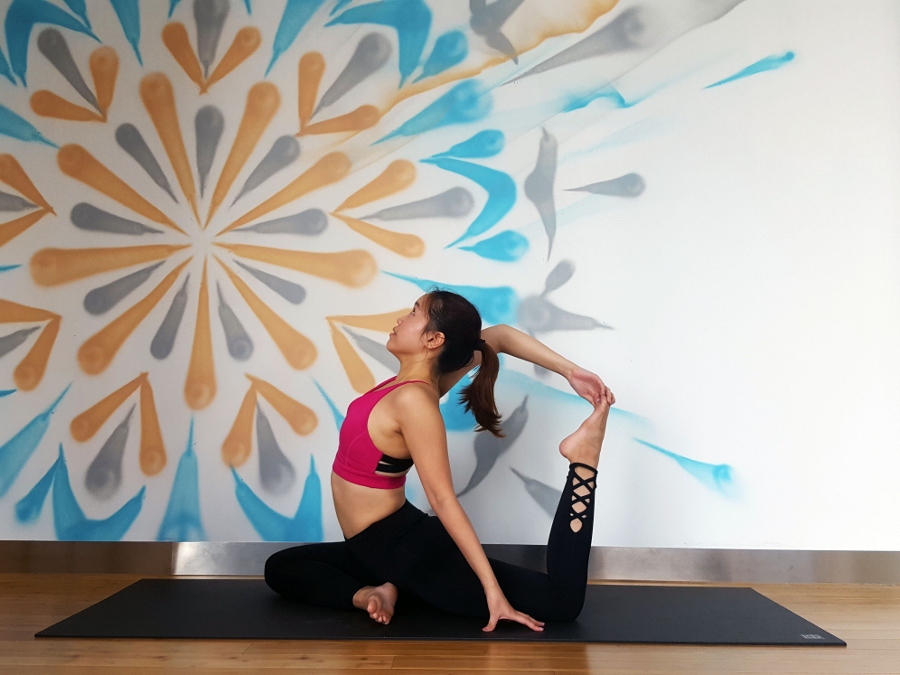
I started my regular yoga practice in July 2012, and during a free class by Lululemon, I was introduced to try King Pigeon Pose Rajakapotasana. It was Nov 2013, and starting from zero, I consider that period to still be fairly early into my yoga journey. The pose was possible that day in the sense that I could get the shape and foot touched head but no, it did not feel steady or comfortable.
Having a lot of mobility in my hips (due to anatomy, not training), I plonked down easily into the sleeping pigeon pose and with a few attempts at flipping my grip, I somehow got into the shape of the king pigeon pose! I was totally oblivious back then, to to key points to note when doing this pose correctly.
Unaware (but hey, every beginner goes through that!), I thought I had got it. I thought I had unlocked a pose and could forget about learning this one and moved on to newer things. I thought that was all to it – it got boring to do it over and over again and I never really looked forward when it was thrown in class. After all, it was not the most comfortable pose to be in, and I assume that feeling that way about a pose like this was the default.
But thing is, I probably NEVER did it right – and that ignorance lasted for 3 years. I went for an Advanced class in Real Yoga in June 2016 and had a reality check that I can’t do anything if proper techniques were applied. The teacher made us try king pigeon WITHOUT bending from lower back at all and alas, can’t even get anywhere close. It was as if you realised the person you thought your knew inside out was in fact not the person you thought of them to be. Anyway, I began to realise that lower back bending is NOT part of the whole package when it comes to King Pigeon Pose and many other back bend poses. If you’ve been relying in bending lower back to do these poses, you could shift your focus and you’ll rediscover these poses all over again.
>> King Pigeon Mistakes
✘ I flipped the grip to hold my toes all the time, and 20% of the time it would slip out, 80% of the time grip was not strong (which means legs doesn’t STAY THERE on its own) and shoulders felt pulled whenever attempting to flip grip.
✘ The back quads instead of facing straight down, was lopsided and so my back foot was always pointing inwards towards my body rather than pointing up straight to ceiling, when knee was bent.
✘ I felt it in my lower back when everything was gripped and touching. Couldn’t wait to exit it after toes tapped on head for 3 seconds.
✘ Body was titled towards on side instead of being centered – it felt like collapsing. I didn’t get to breathe smoothly.
✘ In order to touch the toes, I dropped my head at a deep angle in order to reach and sometimes it leads to neck ache after.
>>King Pigeon Correction
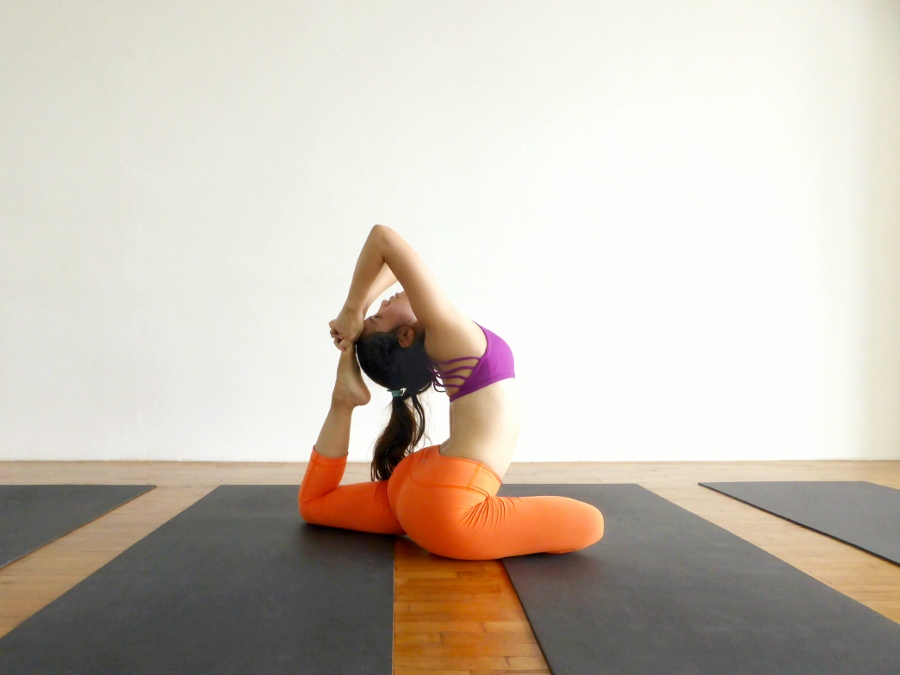
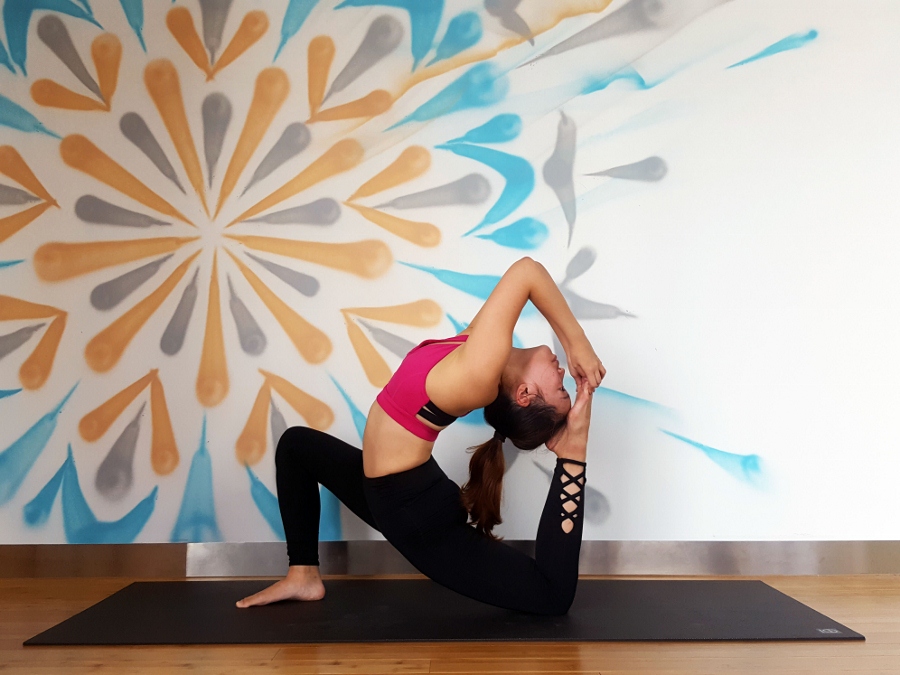
✓ Engaging mula bhanda, I could keep my body in the center. The butt of the front leg does not sit down – keeping it lifted and core and legs all engaged makes the hold stronger and more controlled. Quads of back of thighs ENTIRELY faces down, and when knees are bent, my foot points straight up and can stay there from it’s own effort.
✓ My shoulders are now open enough and I just have to reach back to find my foot. No flipping grip is required now. Via this entry method, my grip on the foot is very stable.
✓ Can stay up in this pose without tendency to collapse to one side, with no strain in shoulders and can even effortlessly reach head to heels.
✓ No feeling in lower back at all. I tilt now my entire pelvic backwards to go back too, instead of pelvic forward and bending from lower back like I did in the past. The curve on my back body is very gradual instead of sharp bend from lower back .
✓ Do not drop your head deeply in order to reach the foot. Instead, you move your whole body and shoulders backwards together and head should easily touch the foot. If it doesn’t, just stop there. No forcing.


Basically at a glance, the pose still looks similar from outside but the feeling is entirely different. Yoga is about the feeling, not the aesthetic. Only when you can do something with no pain and no strain, then it’s considered that you’re doing yoga and getting the benefits. This was something one of my first few yoga teachers mentioned (I learnt a lot from his classes back then even though it was not the most entertaining ones around), and I always bore it in mind even though I did not experience it yet. Seems like it is all gradually making sense, day by day.
>>How to work towards a safe and effective king pigeon pose?
I’ve been doing my amateur standard King Pigeon Pose (like first few images) for 3 whole years and that brought in no improvement. I was doing the same kind of “king pigeon” that I did in 2013 (with the same shitty feeling of strain every single time thinking it was part of it) all the way until the day I realized it was not right. It was only when I started being aware and worked on the areas required, that I finally understood how to feel right in this pose.
It’s just like using the same lousy recipe and method over and over – you’ll not improve on your cooking. You’ll not get a different result. You’ll just produce the same lousy food. Instead, quit trying and start observing what went wrong. Work on improving your basic skills then one day, your food will suddenly taste better than if you were to blindly repeat the process over and over again.
Frequent repetition of a pose done incorrectly can lead to more harm than improvement.
This applies to most other intermediate poses of yoga – improvement doesn’t come by repeated performance of the (incorrectly done) pose. It comes when you’ve prepped your body enough to be able to do it right. For intermediate poses, I believe, it does not work to help you stretch your body. Doing king pigeon over and over again does not give your flexibility.
Instead, you do basic poses to stretch it out, then you attempt king pigeon to express your flexibility. The final expression of the pose is to express your amount of flexibility, not to help you open up. It’s like you don’t use Hanumanasana as a way to stretch your hamstrings – it may just tear. You do gentler stretches like Half Hanumanasana or with the help of blocks to open your hamstrings up, then you attempt full pose when body is ready. Don’t be shy to use props.
(I know some lineages of yoga insists that if you do it over and over again you’ll get it..*ahem* Bikr..m *ahem*… but yeah in the process you’ll get injured here and there and probably still do pose wrongly after 5 years.)
So anyway, where are the areas to work on:
The shoulders
Your shoulders got to be open enough for flexion movement in order for arms to reach back to find that foot.
Try holding in Extended Puppy Pose, do not cheat! Adjust to where you chest and armpits are still close to the ground but not touching so the gravity can help you stretch the shoulders. With the help of a strap, hold it taut just slightly bigger than shoulder width with elbows straight, bring your arms up over and behind your head. Repeat. When doing basic stuff like sun salutation, hook your thumbs together when stretching out in a standing position or low lunge, so you work on bringing your shoulders back rather than to back bend from lower back. This trains to improve mobility of shoulders.
The quads and hip flexors
In order for the back leg to be stable and point upwards towards the ceiling and not anywhere else, you MUST have your front thighs aligned flat on the mat. Having it lopsided will result in your foot pointing somewhere else. For this to happen, your hip flexors/ quads/ psoas needs to be open enough. Also, open hip flexors will allow you to bring your whole pelvic backwards so you can minimize the bend on your lower back. This is very important when you want to eliminate strain from this pose and perform it safely.
You should be aware of this – if your foot is pointing sideways instead, work on making it point straight up with it’s own effort. By flipping grip and using arm strength to pull it center will not be helpful because the pose is off balance to begin with.
Low lunges, bhekasana, ardha bhekasana, hero pose – there are many poses that helps you stretch the quads. Quads will take a long time to loosen up especially if you’re an athlete, so be patient. Holding in these poses for 3 to 5 minutes, Yin style, is helpful. It may be painful, so use blocks to minimize any stress in order to allow you to hold it longer. For stretching, it only counts if you hold it long. Going deep for 30 seconds is not as good as holding it moderate for 3 minutes. Do the right thing.
The Mula Bhanda or Root Lock
New yogis will find this hard to understand, but it is basically called the root lock, which means you want to focus to keep in your energy from your pelvic floor muscles. Like when you are holding in a pee, that kind of feeling. This root lock is important because it gives you the control and stability to hold upright in this pose, and many other poses in yoga. You should work on the strength in that area. Try the feeling of clenching your gluts (butt) together and make sure your both hips can lift slightly off the mat and stays there. if you’re sinking down onto the mat and find it hard to lift up, it means that you need to work on it more. The final pose cannot be done safely if you’re sinking and powerless. The core would feel somewhat engaged too and your body will be stable.
>> Check list before attempting final expression of King Pigeon
- Your back foot can point upwards to ceiling effortlessly.
- Your Mula Bhanda is engaged and both hips can be lifted off the ground, not sinking, and your pelvic bone can be more upright instead of leaning forward.
- You can choose to flip the grip, but make sure reaching your arms back directly is also an option when reaching for the foot. It means your shoulders are open enough.
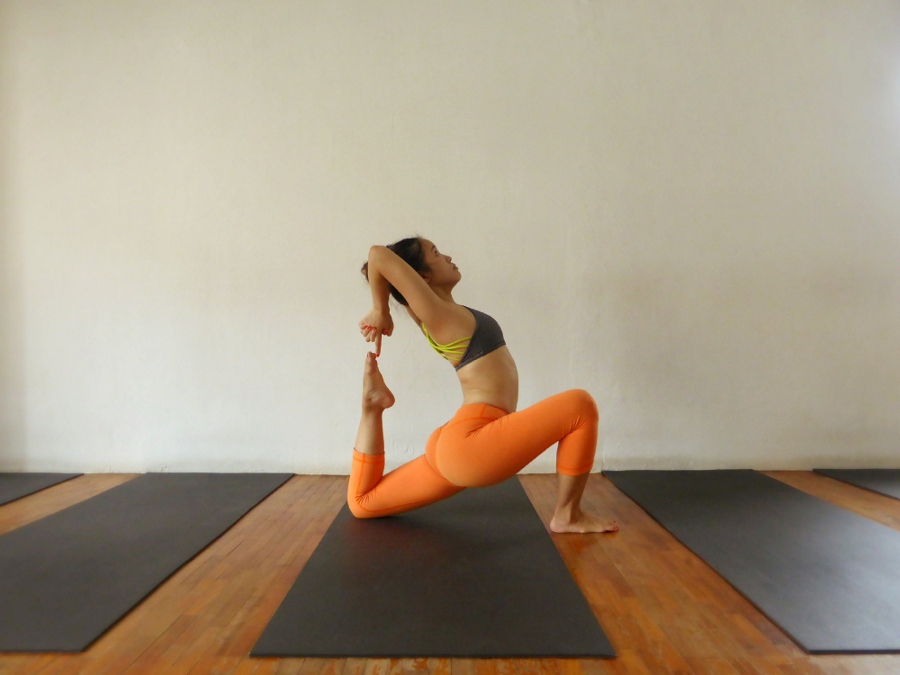
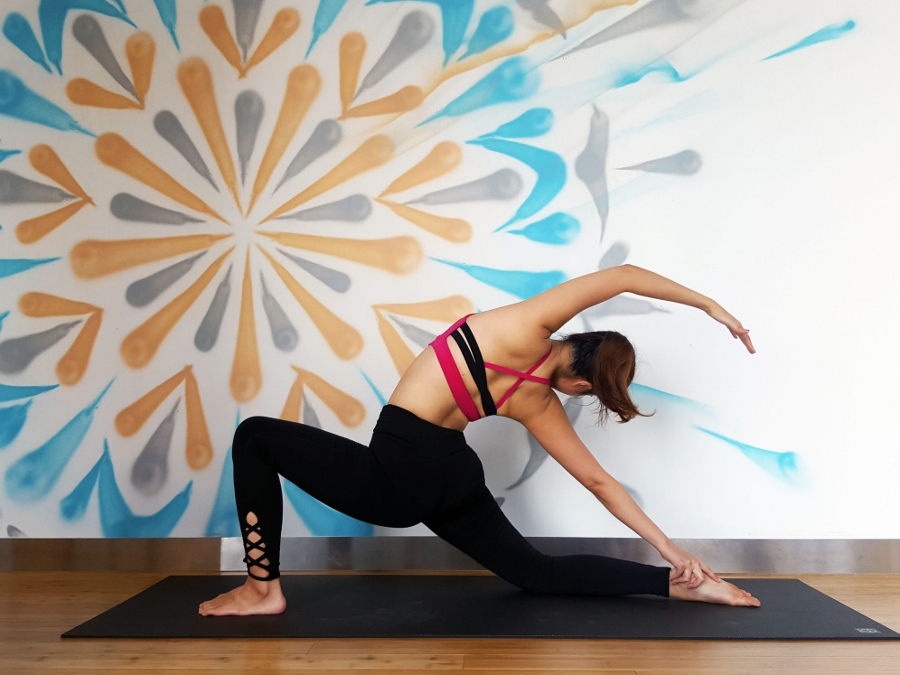
When regular king pigeon is not exciting enough for you, and you feel that your quads are very open, try it in a lunge variation!
Disclaimer – your quads must be VERY open as a prerequisite, or else it’s just going to feel terrible everywhere. Quad stretching exercises are mentioned above, do practice it.
The points to note for this variation is similar:
- Back quads must face directly down to the mat so that back leg can point straight up to the ceiling.
- Mula Bhanda engaged so that pelvic does not sink and doesn’t sink forward.
- Peel the pelvic bone away from front thigh and move entire torso with pelvic bone backwards.
- Reach arms back and find the foot. In fact, foot could be able to touch the head even without the use of the arms if first 3 points are done right!

Hello, I was wandering if you could tell me some exercices on how to rotate both my shoulders and elbows. I feel my back is flexible enough but I canno’t rotate the elbow, it’s like it is block. With time will it open or is it just anatomically impossible for me? Thank you very much.
LikeLike
Hi!
For shoulder opening you can try the following:
1. passive stretching: extended puppy pose – hold it for like 5 minutes. check that your hips are above the knee and aim for your chest and armpits to reach the ground. if your shoulders are tight it would not touch down, but do it everyday and hold it in and observe any improvements over time. this will stretch the muscles in your pecs (chest) too and that could be a reason that’s holding back your backbend. When your chest manages to touch down you can then aim for your armpits to reach down onto the mat – keep your arms shoulder with apart throughout (it will be easy if arms flare out so do not) bending your elbows only 90 deg so that your hands is facing directly up (do not bend more than that, it will ease the stretch). this will give a deeper stretch in the extended puppy pose.
2. for a dynamic stretch, use a yoga strap or towel and hold it taut in front of you (start with approx 1m length or more). then with your arms straight bring the taut strap above your head and then behind you, as if doing a 360 deg rotation of your shoulder joint. do it repeatedly if it is easy then shorten the strap. gradually when your shoulders open you will be able rotate with a shorter strap.
if the above is actually already easy for you then perhaps it is the bone anatomy that is hindering your progress, but if doing the above makes you feel tightness in the muscles then perhaps it will open up with more practice. good luck!
LikeLike